Author: Ken Chan

  • Palo Alto Junior Museum and Zoo

    The Palo Alto Junior Museum and Zoo is a great San Francisco Bay Area destination for children. Located in Palo Alto, the museum offers fun and education exhibits targeted towards its young visitors.

    junior-museum-6536

    The exhibits at the museum do change. The current one is focused on bugs, which showcases various insects.

    bugs-4134

    Outside, you can see the various live animals in their collection. The large pond is home to Roxy, an embden goose, as well as assorted ducks, turtles and rabbits.

    emden-goose-6577

    The bobcats appear more cute than menacing.

    bobcat-4145

    If you are lucky, you’ll see Sequoia the bald eagle or Boeing the red-tailed hawk. They were with their trainers on the day I visited. Not sure where these majestic birds hang out regularly.

    bald-eagle-6598

  • Green Onion Pancake Recipe

    This is my way of making green onion pancakes or 葱油饼. It is not the traditional way.

    1. Boil a cup of water.

    2. Measure 10 oz. of all purpose flour and pour into a food processor.

    I don’t use anything special. Just the industrial size bag of flour from Costco. I’ve tried countless green onion pancake recipes, and never without success. The pancakes would always end up hard like a cracker, so I abandoned the printed proportions and made the dough by sight and touch. Better, but inconsistent. After reading The Science of Good Cooking by Cook’s Illustrated/America’s Test Kitchen, which explained how measuring flour by volume was imprecise, I switched over to measuring flour by weight. My dough is now consistently soft.

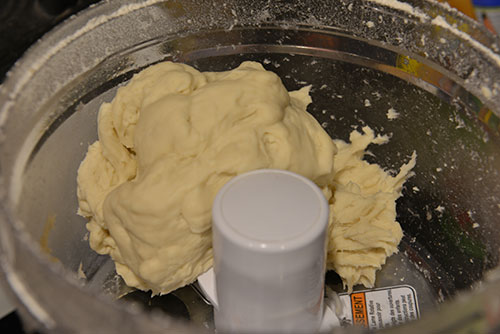
    3. Measure 6.25 oz. of boiling water, slowly pour it into the food processor as it is running, and let it run for a few minutes after the dough has come together.

    I place a liquid measuring cup on the kitchen scale, zero it, and then ladle the boiling water into the measuring cup. The pyrex measuring cup makes it easy to pour the water into the food processor. After the dough comes together, I let the food processor run for about two minutes. The end product looks something like this:

    green onion pancake dough

    Note: 6.25 oz is about right for the 25 lb bag of Costco flour. I recently switched to the smaller 2-10 lb bags of organic unbleached all purpose flour (also from Costco). I had to add a touch more water–6 3/8 oz–or else the dough ended up a bit dryer.

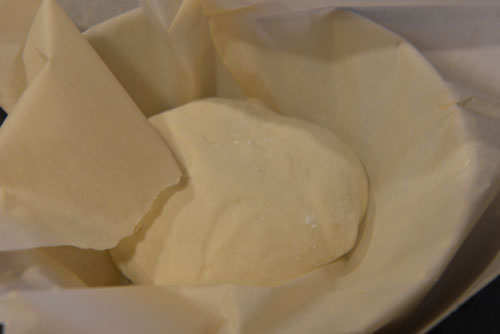
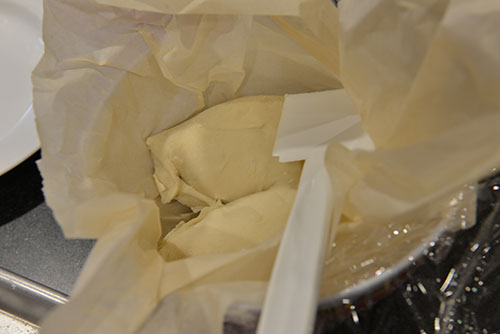
    4. Remove the dough and knead it a few time. Cover the dough and let it rest for 20 minutes.

    In a small rimmed baking sheet, I add a bit of flour. I use a rimmed baking sheet just to keep the flour from getting everywhere. I also dust my hands with flour and remove the dough from the food processor. On the baking sheet, I knead the dough a few times until it is in the shape of a ball. Use just enough flour to keep it from sticking. I then line a large bowl with a sheet of parchment paper, drop the dough ball inside, and cover with plastic wrap.

    resting dough

    5. Chop the green onions and clean up the food processor.

    Now is a good time to clean up the food processor before the remnant dough dries out. Also, chop about 2-3 stalks of green onion.

    6. After 20 minutes, cut a wedge of dough. Heat up a flat bottom pan on low heat.

    I had a sharp scraper that came with the food processor. I cut a wedge that is 1/6th of the dough ball so that I end up with six green onion pancakes. Now is a good time to heat up a pan. I cook my pancakes on low heat. So some oil and let the pan slowly warm up.

    wedge

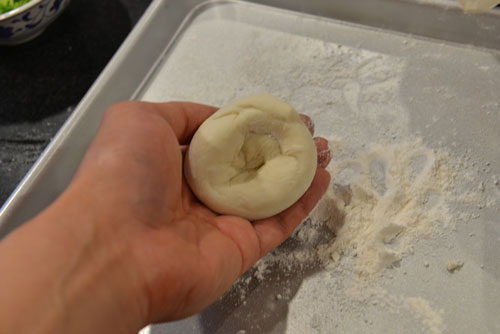
    7. Roll the wedge into a ball, and then use your thumbs to press a dimple into the dough.

    Again, I dust my hands with flour, grab the wedge and shape it into a ball. I use my thumb to press down the center of the dough, while turning it around to make the center even. This is the non-traditional part. Every other recipe will tell you to roll out the dough, spread the green onion/sesame oil/salt mixture, and roll up the dough into a log. Then, coil it like a snail shell before flattening it again with a rolling pin. I’ve always had problems with the green onions bursting out and blackening during the cooking process so I do it my way.

    dimple

    8. Fill the dimple with chopped green onions.

    green-onions

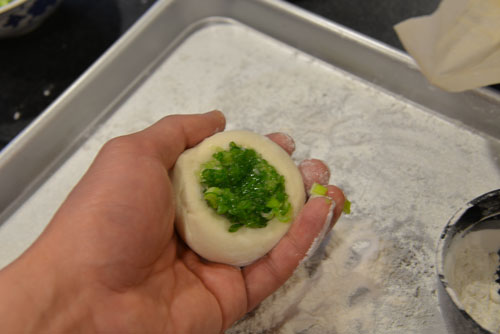
    9. Close up the dough.

    Hopefully, this part will not be too confusing. The best way to describe this is like if I were making a bun/bao. I pull up the opposite sides of the dough until the green onion is covered, pinch the top together, and give it a twist.

    round

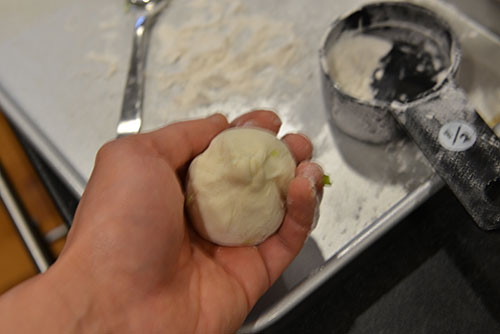
    9. Add a pinch of kosher salt and gently roll out the pancake.

    Try to keep the green onions inside the pancake.

    flatten

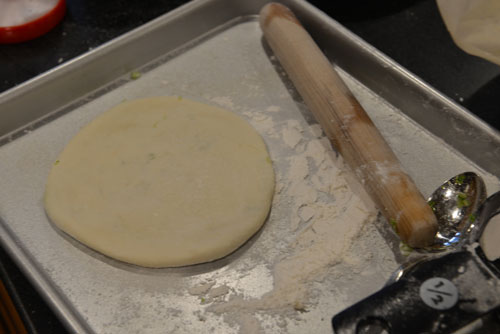
    10. Cook the pancake.

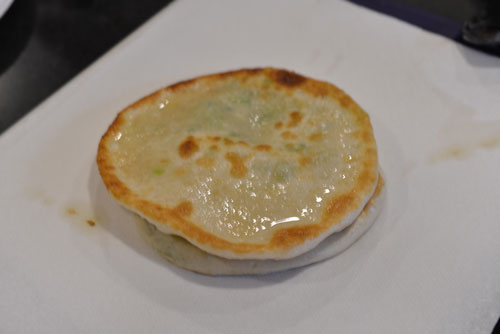
    Hopefully, the pan is hot by now. I might 1-2T of oil into the pan. I just want enough so that the pancake is in contact with the oil so that it will cook evenly. I cook the pancake in a covered pan for a few minutes. It all depends on the heat of the pan. Once the pancake is cooked on one side (I go by looks), I might add some more oil back in the pan as I am flipping it over to cook the second side. Hopefully, the end product will look like this:

    green-onion-pancake

  • How to Make Naan

    It all started at Howie’s Artisan Pizza. I really loved their pizza crust. After buying a dough ball from them, I discovered how dough should feel in the hand: soft and malleable. In other words, I was not using enough water in my recipes. With this insight, I was finally able to crank out green onion pancakes (葱油饼) fairly consistently by relying on my eyes and sense of touch, instead of the measuring cup. Now, on to the naan.

    I started with Mark Bittman’s naan recipe from How to Cook Everything.

    2 tsp instant yeast
    2 Tbsp milk
    2 Tbsp yogurt
    1 Tbsp sugar
    4 C all-purpose flour
    1 egg
    2 tsp salt

    I’ve made this a few times. Bittman has a specific order for mixing some of the ingredients (i.e., yeast, milk, yogurt and sugar), but I was even more minimalist by adding all the ingredients (except for the water) together in the food processor with no ill effect.

    With 葱油饼, naan or pizza dough, getting the right amount of water is crucial. Too little and the dough is hard. Too much and the dough is wet and sticky. Better to get it right on the first try, than to tinker around and try to fix your mistakes. So, with the food processor running, stream the water slowly into the food processor until the dough comes together into a ball. The first time I tried this, I used warm water (like with 葱油饼) and the dough rose nicely. The second time, I tried making the dough in the morning with room temperature water and leaving the dough in the refrigerator all day to let it rise, as Bittman suggested. I’m not sure that the dough rose at all in the second instance, but the naan was just as delicious.

    Instead of an oiled bowl, I usually just place the dough in a bowl lined with parchment paper.

    After the dough has risen (or not), I slice a wedge of dough and shape it. For that piece, I think I added some chopped green onions.

    Here’s where I depart from Bittman. I have had no luck making the naan in an oven, even with a baking stone. The end result always ends up too dry. So, I tried it in a covered frying pan (just like with 葱油饼) with a touch of oil.

    A touch of butter at the end is optional. Maybe this is not authentic naan, but naan “with Chinese characteristics.” Regardless, the end result was pretty close.

  • iOS 6 Maps

    For better or worse, iOS 6 brings a new Maps app. The 3D button offers a cool three-dimensional view of nearby buildings. The feature is much more impressive when browsing around the City. The 3D effect is practically unnoticeable in burbs of Mountain View.

    I see two big changes in the new Maps app. First, the Maps app finally offers voice navigation. Initially, I was looking for some setting or button to enable this feature. There is none. Instead, just search for directions and voice navigation kicks on automatically. I tested it on the way home this afternoon and it was able to re-route as I took a U-turn to avoid traffic.

    I already have the Navigon app, however I like the Maps app much better already. The strength of the Maps app is that it announces street names so there is no doubt which exit you should be taking or which street you should be turning on. Navigon has led me astray more than once because its directions were confusing. Navigon doesn’t announce exits or street names. It just tells you to bear left, bear right, turn left, turn right, etc., which is perfectly fine in a city with a grid layout. When that is not the case, Navigon is exposed. However, in remote locations, Navigon with its preloaded maps is incomparable. When you don’t have a 3G/4G connection, the Maps app isn’t going to help.

    The other big change is the traffic data. Even with the traffic layer enabled, I am not seeing any data. The Maps app did indicate the 101 was red earlier this afternoon. In contrast, looking up Google Maps in Safari gives you the traffic data that the Maps app is missing.

    So, I will probably use the Maps app, unless I’m headed to a remote area with no internet connectivity.

  • Eshom Campground, Sequoia and Kings Canyon National Park

    While trying to find a campground at Sequoia & Kings Canyon National Park on short notice, I came across Eshom Campground, which had a camp site open for reservations. On Google Maps, the campground appears a short drive from Grant Grove. But, in this case, appearances can be deceiving.

    On the ReserveAmerica website, the location of the camp was given in GPS coordinates, which I had dutifully entered into the NAVIGON iPhone app before departure. I had fully expected to lose cell phone and possibly data connectivity in Sequoia and Kings Canyon National Park, and thought that I had a back-up in NAVIGON.

    So, from Grant Grove, I was presented with two options. ReserveAmerica told me to back track along 180, then take 245 before turning onto Whitaker Forest Drive, which leads to the campground. On the map, this was the roundabout route. On the map, Forest Route 14S75 seems to provide the most direct route. However, (1) it is a dirt road, (2) the path suddenly turns extremely bumpy about half way down, and (3) NAVIGON got confused along the way and kept asking me to make a U-turn along a single path. So, the ReserveAmerica route is the sure thing, while the dirt road option is for the more adventurous, particularly since there is no signage along the way to indicate that you are headed to Eshom Campground.

    I was in camp site #16, which was next to an open field. Although there were tall trees surrounding the camp site, I found enough of a clearing to take some night photos.

  • MacBook Pro SSD Upgrade

    I have a MacBook Pro. A 17-inch, Mid 2009 model. I have been staring at the MacBook Pro with Retina Display for some time now. But once it is configured with 16GB of memory and 768GB of flash storage, the price climbs to $3,499, and that model is not in stock…yet.

    However, I did not have time to wait because the drive inside my vintage MacBook Pro has been feeling stuffed. All it took was a session with a borrowed Nikon LS-4000 to scan whatever negatives I still had on hand to deliver me to perilous ground. 10GB, 5GB, 1GB and then the warnings start popping up about the need for space on the system disk.

    Fortunately, Other World Computing had a 960GB SSD available. Now, the MacBook Pro has room to breathe again with more space than the maxed out Retina Display model.

    All it took was 2:42 hours to transfer close to 480GB of data from the old SSD to the new one via Firewire 800, thanks to SuperDuper!

  • Sweetwood Group Camp at Half Moon Bay State Beach

    We went camping a few weeks ago at the Sweetwood Group Camp site in Half Moon Bay State Beach. Reserve America rated Sweetwood as primitive, which certain gave me some pause. I wasn’t exactly sure what to expect. As it turned out, we were far from being consigned to the Stone Age at this camp site.

    Sweetwood Group Camp offers a fire pit, picnic benches, running water, and toilets (of the non-flush variety). These amenities are more than adequate for a short weekend outing. The camp site is far from remote, so if you require anything, a number of stores and restaurants are but a short drive away.

    At night, the stars are visible. However, even though I was along the relatively undeveloped coast, there was quite a bit of light pollution. If you want to take photos of the night sky, the best plan would be to check the weather in advance so that you will know if the overhead skies will be clear or cloudy.

    During the day, you will see all types of wildflowers.

    I also loved the pelicans roaming along the coast in search for fish.

  • This American Life: Americans in China

    Was listening to the Americans in China podcast. Includes the requisite discussion on search engines and censorship.

  • Año Nuevo State Park, Pescadero, CA

    Inspired by AAA’s Top Beach Towns for Summer article in the most recent issue of VIA Magazine, I headed out to Pescadero for the first time. I first stopped at Arcangeli Grocery Co..

    The original plan was to picnic at Año Nuevo State Park; however, since it was already close to lunch, we ate at the picnic tables behind Arcangeli. We enjoyed two loaves of still-warm artichoke garlic bread, cheese, ham and turkey, all purchased from Arcangeli. After a day of adventure, we only had a small corner of bread left.

    Pescadero is not a big town. In fact, all the dining establishments mentioned in the VIA Magazine article are all on the same block of the same street. So, you can easily walk around town and find what you like.

    After our lunch, we headed off to Año Nuevo. Summer is the off-season for the elephant seals, so it was not crowded at all.

    From the visitor center, the path to the South Point and North Point viewing stations is quite picturesque.

    Spotted some red berries along the way.

    Usually, I only see pine cones on the ground. Here, the pine cones are visible on the tree.

    After a short hike, we arrived at the J. Thomas Staging Area. Beyond this point, you need a permit, which can be obtained at the visitor center.

    The path out to the viewing stations can be a bit tiring, with plenty of energy spent walking on the sinking sand.

    Before the seals were visible, I could already hear them barking. However, at South Point, I only spotted a handful of seals. Most of them were snoozing under the warm sun.

    The bulk of the seals were at North Point.

    Perhaps, just enough to make the experience interesting. While most the seals were relaxing on the beach, a few of them were mixing it up on land:

    and in the water:

    On the way out, we stopped off at this secluded beach.

  • MacBook Pro with Retina Display Unboxing Photos

    A MacBook Pro with Retina Display showed up this morning.

    First, the top cover of the box was removed. The MacBook Pro was wrapped in a transparent protective film.

    MacBook Pro out of the box.

    The MacBook Pro sits recessed in its box. Below, Apple carefully stored the power cord and other accessories.

    The svelte MacBook Pro with Retina Display resting atop its older cousin, the beastly 17″ MacBook Pro.

    The screen is ajar.

    After pressing the relocated power button…

    The gorgeous Retina Display beckoning its new owner.